Connecting Google Sheets
How to have every lead added as a row in a Google Sheet that CLSD creates and shares with you.
4 min read
Before you start
- A CLSD account
- A Gmail or Google Workspace address to share the sheet with
Tip
Keep your own notes in columns to the right of the lead data, or on a second tab, so the columns CLSD writes stay where they are.
If you like working from a spreadsheet, CLSD can add every lead to a Google Sheet as it arrives. You do not connect your Google account. You tell us which Google address to share with, and we create the sheet for you.
Setting it up
Step 1. Start a new integration
Open Integrations in the left sidebar and click Add Integration.
Step 2. Name it and choose Google Sheets
Give it a Nickname. Under Delivery Method, choose Google Sheets.
Step 3. Enter the address to share with
In Google Account Email, enter the Gmail or Google Workspace address you want the sheet shared with.
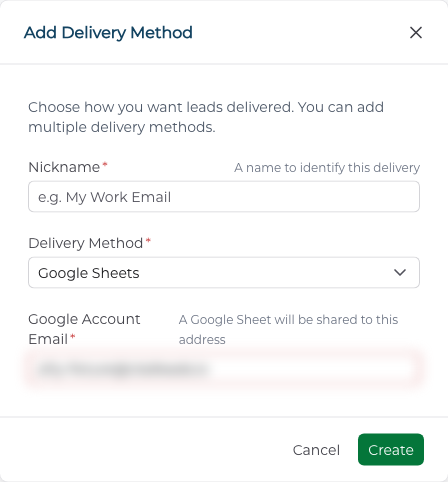
Step 4. Create it
Click Create. CLSD copies a fresh sheet from our template, names it after you with CLSD Lead Delivery Sheet in the title, and shares it with that address as an editor. You get an email with the subject CLSD has shared a Google Sheet with you and an Open Sheet button. The sheet also shows up under Shared with me in your Google Drive.
If you have orders running, CLSD asks whether to attach the new method to them. Leads already delivered on the orders you pick are written into the sheet, and the window shows roughly how long it will take.
Note
One sheet is created per Google Sheets method, not per order. Every order you attach the method to writes into the same sheet.
The sheet
On Integrations, the card for your Google Sheets method has an Open Sheet button. The card also shows the address it was shared with.
Each lead is one new row at the bottom. The columns are First Name, Last Name, Phone, Email, Received, Amount of Coverage, Timeline for Coverage, State, Beneficiary, Purpose of Coverage, Age, Favorite Hobby and Current Coverage. Received is the date and time the lead was delivered to you, in Central time.
Warning
Keep the first tab named Sheet1 and leave the columns where they are. New rows are written by position, so a moved or deleted column puts data under the wrong heading. Add your own notes in columns to the right of the lead data, or on a second tab.
Sending a lead to the sheet again
Step 1. Find the lead
Open Leads and click Actions on the row.
Step 2. Push it
Choose Re-Push Deliveries, and click Push next to your Google Sheets method.
Disconnecting
Archive on the card stops new leads going to the sheet. The sheet itself stays in your Google Drive with everything already in it. Archived methods are on the Archived tab, where Reactivate turns one back on and Delete removes it from CLSD for good.
Troubleshooting
I cannot find the sheet
Open Integrations and click Open Sheet on the card for your Google Sheets method. In Google Drive it is under Shared with me, shared with the address shown on the card, and the title includes CLSD Lead Delivery Sheet. Check that you are signed in to Google with that same address.
A lead did not land in the sheet
Open Leads, click Actions on the row, choose Re-Push Deliveries, and click Push next to your Google Sheets method.
I deleted a row and the lead came back
Deleting a row does not remove the lead. CLSD checks your sheets against your lead list from time to time, and a lead that is missing from the sheet is added back. A lead from a Premier order also stays on your Leads page, and a lead from an aged order stays on that order's own page.
Does deleting the method delete my file?
No. Deleting the method in CLSD does not delete the file from your Drive. The sheet stays there with everything already in it.