Connecting LeadConnector
How to send every lead straight into your LeadConnector or HighLevel CRM as a contact, with the fields, tags and notes you choose.
4 min read
Before you start
- A CLSD account
- A LeadConnector or HighLevel account (including CallBack, Link+, LIA CRM or CLSD CRM) with access to the location that should receive leads
Tip
Age, Received and the coverage answers only reach your CRM if you map them, so open Configure Mapping once right after you connect.
LeadConnector is GoHighLevel, and several partners resell it under their own name, including CallBack, Link+, LIA CRM and CLSD CRM. If you use any of them, CLSD can create a contact for every lead. This article covers connecting it and choosing what lands on the contact.
Connecting your account
Step 1. Start a new integration
Open Integrations in the left sidebar and click Add Integration.
Step 2. Name it and pick your CRM
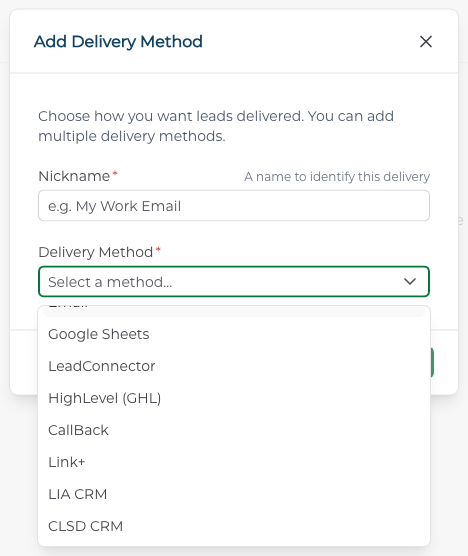
Give it a Nickname. Under Delivery Method, pick the name your CRM goes by. LeadConnector, HighLevel (GHL), CallBack, Link+, LIA CRM and CLSD CRM all make the same connection, and the card is labeled with the one you pick.
Step 3. Create and connect
Click Create & Connect. LeadConnector opens. Sign in, choose the location (sub account) that should receive the leads, and approve the access it asks for.
Step 4. Link the delivery
Back in CLSD, on the Link to LeadConnector page, pick the method you just made under Select Delivery and click Link Delivery. Back on Integrations, if you have orders running, CLSD asks whether to attach the new method to them, and sends the leads already delivered on those orders into your CRM.
What lands in your CRM
Every delivered lead becomes a contact in the location you connected. If a matching contact already exists, it is updated. On every contact, CLSD sets the first name, last name, email, phone and state (as the full state name), and sets Source to CLSDleads.io. Everything else is up to you through Configure Mapping.
Note
Those five fields and Source cannot be remapped. Age, Received and the coverage answers only reach your CRM if you map them.
Configure Mapping
Step 1. Open the window
On the card for your connection, click Configure Mapping. The window has three tabs.
Step 2. Map fields
On Field Mappings, click Add mapping, pick a lead field on the left and the contact field it should fill on the right. The lead fields you can map are First Name, Last Name, Email, Phone, State, Lead Type, Lead Language, Age, Received, Beneficiary, Favorite Hobby, Purpose of Coverage, Amount of Coverage, Timeline for Coverage and Current Coverage. The right side lists your location's standard and custom contact fields, and View all LC fields shows the full list.
Step 3. Set tags
On Tags, type a tag and press Enter or comma. You can set tags for All leads, By lead type and By lead language. The first time you open the tab, three defaults are already there, clsd on all leads, final expense on Final Expense leads and medicare on Medicare leads. Remove any you do not want. Tags are added, and any the contact already has stay. Each tag can be up to 100 characters.
Step 4. Add notes
On Notes, click Add note to add a note that is written onto the contact when the lead arrives. Give it a title and a body, and use Insert field to drop in details such as {{firstName}}, which fill in from each lead. Notes use the same three groups as tags, up to 20 of them.
Step 5. Save
Click Save Changes.
Troubleshooting
The card on Integrations shows Reconnect
CLSD can no longer reach your CRM, for example after a password change or if the location was moved or closed. You also get an email with the subject Your LeadConnector connection on CLSD expired. Click Reconnect and approve access. Your orders and mappings are unchanged.
Leads arrived while the connection was down
Once you have reconnected, use Re-Push Deliveries on the Leads page to send them. See Viewing and exporting your leads.
A lead's age or coverage answers are not on the contact
Only first name, last name, email, phone, state and Source are set on every contact. Age, Received and the coverage answers reach your CRM only when you map them on the Field Mappings tab of Configure Mapping.
How do I stop leads going to my CRM?
Archive on the card stops leads going to your CRM. Contacts already created stay in your CRM. Archived methods are on the Archived tab, where you can Reactivate or Delete them.